Monday, December 17, 2012

Dress Up Wardrobe from a Dresser


I can take no credit for thinking this up - saw it on Pinterest.  One $20 craig's list dresser later, a little paint, new knobs, and finally, finally the pile of costumes is off the floor where it had exploded out of a little suitcase and threatened to become sentient and carry off the children.  A bonus is trying to instill in the children that when you put things away and can see them, dress up is far easier and much more fun!
Posted by Picasa

Monday, November 12, 2012

Fall


Our gorgeous tree was just kind of a purple color when all the other leaves were out.  Then suddenly this week, fireworks.

The bees didn't make it this year.  Here is the top bar hive broken down for winter.

Comb they can use next spring.  I'm not discouraged, but a bit more experienced.

And how lovely.
Posted by Picasa

Wednesday, October 24, 2012

Homeschooling - Halloween Math


Frankies (and Mummies) arithmetic from No Time for Flash Cards

Haunted house and ghosties arithmetic from Pre K and K Sharing - we modified to be a haunted house drawn on the white board, simple addition equations are under the ghosties.  J really liked making the materials for both of the exercises!  It helped motivate him to do the math - which he normally will resist - the combo of the monsters he made and the new activity interested him and he focused and enjoyed it.
Posted by Picasa

Saturday, August 18, 2012

Pink Cake with Strawberries


Somebody is turning FOUR (with one candle to grow on).

I made a pink ombre cake.  Now, I don't think that ombre necessarily belongs everywhere.  Don't hate me, but neither do chevrons!   But this seemed like a pretty ok place for a bit of ombre.  You have to make the layers anyway, why not distinguish between them? 

The cake itself is the yogurt orange cake from a tattered old copy of the very first Moosewood cookbook.  It makes a nice moist cake with a good crumb and you can flavor it anyway you like.  And, you know, despite the cup of butter in it, it also has yogurt, so it's kind of good for you, right?

The frosting is not good for you at all, but oh so good.  A stick of butter, 8oz of cream cheese, a tsp vanilla and a Tbsp lemon juice, and 2-3C powdered sugar depending on how stiff you need it.

Can I just say my little girl's eyes rolled around a little in her head when she saw how big and how pink her cake was?  AND it had strawberries?  AND a surprise amount of pinkness INSIDE? 

Happy Birthday, sweet P.  Many many happy returns.

PS - I've been away for a while.  Nothing major, just summer.  There is always so much to do, and photographing it seems so secondary - let alone sit down at the computer.  See you soon with our homeschooling adventures, year one.
Posted by Picasa

Wednesday, July 18, 2012

Pendulum Painting Outside

Pendulum Painting didn't get into the Art and Yoga Camp but I hope to try it again in the one we do in August.  Easy to set up but the trick is getting the ratio of paint to water correct - too much paint and it just makes spots.  Also crucial is the distance to the paper from the paint tip - closer makes more "spirograph" lines, farther up in the air makes "dotty" paintings - both have their charms!

Tuesday, July 17, 2012

Paper Mache Volcano and Wet Felting with Kids

 Also from the Art and Yoga Camp - paper mache volcano with a bottle inside to allow for vinegar and baking soda lava.  JUST like on the Brady Bunch....
Wet felted vignettes - made inside plastic bags.  With tabs sewn into the tops and hung on twigs they make cute little art.

Friday, July 13, 2012

Big Painting

 Another go at painting on craft paper on the sidewalk - this time for Art and Yoga Camp.

Wednesday, July 11, 2012

Milk Jug Makeover

A yard sale purchase for a dollar - it had been in a garden and had lots of rust.  I sprayed it with rust stopping paint (black) then two coats of our trim enamel.
 Following a tip from pinterest (of course) I used the stock market pages to transfer a design I found from a vintage milk bottle for sale on ebay.  I blew it up to letter size and didn't worry about the poor quality since I was just tracing it and it was a pretty simple graphic.  The stock market pages technique worked very well!

 I covered the tracing with red permanent marker.  After having the milk jug for two years in the rusty state, I was suddenly unable to wait the amount of time it would have taken to go get a paint pen.  The color looks great so far - not sure how it will hold up or fade yet.  But I can always trace back over it.
 I love the back of the bottle - so cheerful!
 Now we have a pretty little stand in our entry way for the flag when not flying and umbrellas, canes, etc.  I love it.


Friday, July 6, 2012

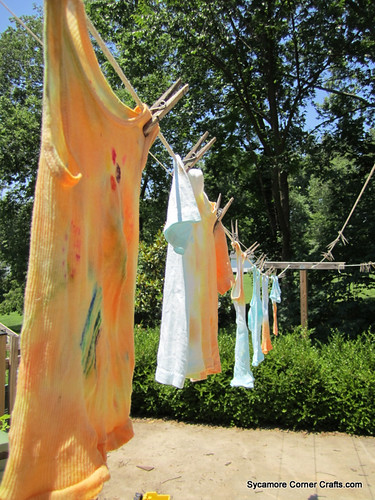
Tie Dye with Kids and Koolaid

IMG_6905 by carolynindc
There's something about summer.  We DO a lot more, and we HAVE a lot less time to do things like blog about our projects!

This was a project a month or so back - tie dye with koolaid.  The great thing about koolaid dyeing is that it is completely safe with kids.  You don't need to set the colors with vinegar, because the citric acid in the koolaid will do that.  It is cheap.  You can play around with mixing and dipping.  It comes off your hands by bathtime.

The cons about koolaid is that it dyes protein (animal) fibers like wool much more permanently than cotton.  So for summer t-shirts your results will be short lived if you launder them in the wash.  Wash by hand in cold water, as infrequently as you can, if you want to keep your design.
 

 Of course, if you happen to wash the colors out - you can always dye them again.  All you need is a container and some packets of koolaid - about one packet to 1C of water.  The water doesn't even need to be hot.  PERFECT for little ones to experiment.
Be warned if you have a boy who likes red - cherry koolaid will inevitably fade to pink.  You can always give that one to your sister!

Thursday, June 7, 2012

Fixing Doors


This weekend we fixed THREE doors!  Two aren't really worth showing here.  Our laundry room door has been sticking badly since we moved in.  This wet summer we assumed it was just an old door swelling and we might have to replace it.  Luckily, before we did that, I actually looked at the door as I was struggling to close it and realized that the top hinge was practically off the wall.  Tightening the screws did the trick - now you can shut that door with one finger.  Seriously, it was so bad we were using the other door most of the time.  Wish I had looked up a little sooner!

Then Mr. Sycamore banged on the kitchen door with a hammer, and now it shuts perfectly too. 
I don't know what he did but it really worked.


So here is door number three.  This is the before picture - you will notice, there isn't even a door!  Just an ugly window from the 80s in our serviceable shed.  This is the view when you park in the driveway.  Nothing, but nothing, to look at, unless you count the empty gas can I am supposed to remember to go get filled.

So we took it into our heads to turn 1/3 of the shed into a music studio for playing and recording.  We built a partition wall last summer, and we had two free windows stored in the shed when we moved in.  We bought a door and put up the framing.

And last weekend, fueled by caffeine and some nice weather, we got it all up!  There will be a small deck attached in front, and the whole shed will get board and batten siding which you can see half started around the door.  I can't tell you how it feels to have this big project in place - I know there is a lot to go - the deck, interior walls, insulation, a/c, paint, landscaping, etc.  But all that seems routine now that we figured out how to put this crazy wall together right!

Two thirds of the shed now is mine.  For gardening stuff, tools, projects, painting furniture - once I get  all the junk piled up on the "shed" side cleaned up and organized.

 Check out my ideas on Pinterest and wish me luck!

Friday, June 1, 2012

Another Kid Messenger Bag


For the little Hawkeye in your life.  This one I printed on printable fabric from Joann's (using "stencil" font - after searching through the long long font list for something like a stencil, it was actually named stencil and what do you know, in alphabetical order) then sewed to the flap after I'd made the bag (so I would know the appropriate size).  I made the strap a bit shorter.  Good for medic supplies or even carrying around your army guys.  In my experience kids love having their "own" bags and they always can use more of them for their million and one important things.
Posted by Picasa

Tuesday, May 22, 2012

But Wait, How Are the Bees?

 Doing great!

Sunday, May 20, 2012

First Aid Messenger Bags


While cleaning out the play room for a transformation to homeschool room, I realized that we needed some storage for all our doctor and nurse accessories.  So rather than clean any more I headed to the sewing machine (why is this playroom project taking so long!?)

J had been begging for a messenger bag.  When she saw his, Sweet P. (who is actually the doctor with the most developed bedside manner) needed one too.

When bandaging Poppa the other night Sweet P was sorry to inform him he had Hepatitis D.  (We've been talking about germs and famous doctors like Louis Pasteur.  Hepatitis D sounds much more serious than any of the other Hepatitis you could get, doesn't it.) 

And
(she leaned in and whispered for emphasis,
palpitating his stomach)

...you swallowed a shoe.
Posted by Picasa

Friday, May 18, 2012

Domino 0; Skunk 1

So this recipe (found online) really worked:  1 teaspoon of dishwashing liquid, 1/2 C baking soda, 1 Qt 3% Hydrogen Peroxide (find it in the first aid section).  Holding Domino on my lap I massaged the liquid in all over.  I should have used more right around her face (where she was directly hit) since that is the only part that still has a slight whiff o'skunk.  Then for extra measure we put a little scented conditioner on her, I don't know that it was necessary, but she mostly smelled better after this adventure than she did before.  Then we dunked her in clear water in the tub (I got in with her to get her all rinsed off).  She was surprisingly docile for all this, once we got started she seemed to just resign herself to it.  And a ton of shedding hair came off, so maybe she needed a bath all along.  Toweled her off and she slept in the laundry room to dry.  I put everything - my clothes, towel, etc in the washing machine and it all came out OK by morning.
Did she learn her lesson?  One can only hope.  Our neighbor tells us skunks won't necessarily come where there are cats to bother them.  And we got a new composter that has a critter-proof latch too.  Skunks-b-gone!

Tuesday, May 15, 2012

Bawled Peanuts

I found bags of raw peanuts - "green in the shell" - at the grocery store yesterday and thought I would try to make boiled peanuts for Mr. Sycamore.  As they say here, you used to could find them at the Eastern Market in DC when we lived there, boiling in a big barrel and dipped out for you into a newspaper cone.  You sometimes can find cans of them at the store, but not regularly.  When my husband was growing up in Alabama you could find them along side the road in season.

I looked online and called my mother-in-law from Montgomery.  Here's what you do.

To start, you need raw peanuts.  The package I got included a warning "as with all raw agricultural products it is recommended that you cook these before consuming."  Just as a side note, I read somewhere that among peanut-eating peoples in Africa and Asia, it is much more common to boil or make peanut flour than to dry roast them, and that dry roast is the most difficult to digest.  Peanuts are full of fiber and nutrients, yum.

For 1lb of peanuts (one package) put 8C water in a stockpot with at least 1/4C kosher salt, more to taste (they are supposed to be quite salty).  This is about twice the standard amount of water I found in recipes online, but I trusted Memaw that there should be plenty of water to cover the peanuts and not boil off in the 2-3 hours they need to cook.    When the water is at a rolling boil, add the peanuts.  They will float and there should be enough water for them to boil with some free room.  Bring back to a boil, turn down to medium low, cover, and stir every 20-30 min for at least 2 hours.  Now, Memaw says that you don't need to cover them, and you don't want them to boil over.  For me, I was afraid the water would boil off too fast, so I covered them.  According to Memaw, you don't want them to just simmer, you want to see low boiling - though I suppose if you simmered them you could leave them on longer.  For softer peanuts, boil 3 hours.  Taste them for softness and when they are how you like them or almost, turn the heat off and let them set in the salty water until cool.  The peanuts need a chance to soak in the salt, otherwise it will stay on the shell and in the brine.

You can consume them hot right away, or wait until cool.  If they are too salty for you, rinse and/or soak them in fresh water, but that is not necessary and I hate to mention it because Memaw says not to rinse them (but she is a woman who salted her pizza growing up, so you know she loves her some salt).

If you don't eat them all right away, pack them in an air-tight jar with or without some brine and you can keep in the fridge for up to two weeks.  In our house they won't last that long!

The Southern method to eat them is pop them with your teeth so you get the interior brine, preferably on a porch step if possible, and let the juice and shells fall where they may.

Monday, May 14, 2012

Footprint Painting


This was an utterly fun activity on a hot day.  One package of fingerpaints (~$5 for 4 tubes) and a long roll of scratch paper from Ikea (also $5)  I didn't intend for the fingerpaints to disappear so quickly, I think in future I'd try the various recipes out there for fingerpaints to be more frugal.

Just dip your feet in the paint and you're off.  I tried to control running as the paints were slippery, we had no major wipeouts (hooray) then it was off to the carwash (sprinkler) and inside for a bath before dinner.  Sometimes a break in the routine just makes everything special -
we then had extra time for a board game before bed.

Whenever I see our stray footprinted sidewalk I smile.  We'll have to do it again soon.

Happy Mother's Day everyone!
Posted by Picasa

Friday, May 4, 2012

Construction Site Ice Cream Cake

 After I found the ice cream cakes for sale locally were super expensive (its just ICE CREAM, people!) and that many of them had regular butter cream frosting, I looked online and found several recipes that looked easy enough. 

Here's what we did:  crush a package of oreos (and fruit loops, but they made a kind of funny texture) and let your ice cream soften for 10-15 minutes.  If you are making whipped cream from scratch do that now (I did and added ovaltine for chocolate-y goodness).  You can also use any whipped topping like cool whip - if frozen, you need to let soften the same as the ice cream.  You want a spreadable softness, not melted.

Layers:  bottom crust: oreos.  Some recipes recommend stirring in melted butter to make it more of a graham cracker crust, but I couldn't believe that was really necessary, and the cookie layer worked fine for us without butter.

Pint or 1/2 a large package of softened ice cream

thin layer of oreos

pint of ice cream (we used vanilla on the bottom and chocolate on the top.  One recipe I saw was for peppermint ice cream cake for Christmas, may need to put that on our list this year, it sounded so good!)

Top with a layer of whipped cream and crumbled topping or decoration.  We made our tiny construction trucks (the party favors)  move the oreos around.

This made a 9x12 pan of ice cream cake, plenty for 10 adults and 8 kids, with plenty left over.  You know, for recovering from the party.

Knowing how easy this is to make - there isn't any cooking, just spreading and freezing - I won't ever buy one again.  After all, it is just ice cream.

Tuesday, May 1, 2012

Collossal Squid

A birthday present from the fabulous Auntie G.  Bigger than a 5 year old, and twice as squishy.

Sunday, April 22, 2012

First of the Year


 Is there any combo better than strawberries and rhubarb?
Thank you Sweet P for a brilliant idea for dessert.

But wait - how are the bees doing after a week?

Building comb like crazy.  Go bees, go!

Related Posts with Thumbnails